前言
markdown记录, 纯静态, git免费托管个人网站, 拥有网上个人小窝so easy, 来吧和我一起折腾解锁各位高阶用法
环境与工具
- OS: Deepin 15.11
- Node.js: v12.13.0
- Npm: 6.12.0
- Hexo: 4.0.0
- NexT: 7.4.2
- IDE: VS Code
Node.js
Node.js官网下载页面选择自己的OS版本下载部署包, 推荐长期支持版(LTS), 因为是我Linux环境, 选择Linux 二进制文件 (x64), 以下是我的安装步骤
- 下载二制包并解压
1
2
3
[root@VM-202 ~]$ wget https://nodejs.org/dist/v12.13.0/node-v12.13.0-linux-x64.tar.xz
[root@VM-202 ~]$ sudo tar -xJvf node-v12.13.0-linux-x64.tar.xz -C /usr/local/lib
[root@VM-202 ~]$ sudo vi /etc/profile - 配置
/etc/profile, 在最后增加, 确保路径正确1
export PATH=/usr/local/lib/node-v12.13.0-linux-x64/bin:$PATH
- 重载
/etc/profile, 测试效果1
2
3
4
5
6
7
8
9
10
11
12
13
14
15
16
17
18
19
20
21[root@VM-202 ~]$ sudo source /etc/profile
[root@VM-202 ~]$ npm version
{
npm: '6.12.0',
ares: '1.15.0',
brotli: '1.0.7',
cldr: '35.1',
http_parser: '2.8.0',
icu: '64.2',
llhttp: '1.1.4',
modules: '72',
napi: '5',
nghttp2: '1.39.2',
node: '12.13.0',
openssl: '1.1.1d',
tz: '2019a',
unicode: '12.1',
uv: '1.32.0',
v8: '7.7.299.13-node.12',
zlib: '1.2.11'
} - 配置国内镜像
1
2
3
4[root@VM-202 ~]# npm config set registry https://registry.npm.taobao.org
配置后可通过下面方式来验证是否成功
[root@VM-202 ~]# npm config get registry升级Node.js和NPM(可选)
- 升级Node.js
npm中有一个模块叫做n, 专门用来管理Node.js版本的。安装最新1
2
3
4
5
6
7
8
9
10
11
12
13
14
15
16
17
18
19
20
21
22
23
24
25
26
27
28
29
30
31
32
33
34
35
36
37
38
39
40
41
42
43
44
45
46
47
48
49
50
51
52
53[root@VM-202 ~]# npm install -g n
[root@VM-202 ~]# n --help
Usage: n [options] [COMMAND] [args]
Commands:
n Display downloaded node versions and install selection
n latest Install the latest node release (downloading if necessary)
n lts Install the latest LTS node release (downloading if necessary)
n <version> Install node <version> (downloading if necessary)
n run <version> [args ...] Execute downloaded node <version> with [args ...]
n which <version> Output path for downloaded node <version>
n exec <vers> <cmd> [args...] Execute command with modified PATH, so downloaded node <version> and npm first
n rm <version ...> Remove the given downloaded version(s)
n prune Remove all downloaded versions except the installed version
n --latest Output the latest node version available
n --lts Output the latest LTS node version available
n ls Output downloaded versions
n ls-remote [version] Output matching versions available for download
n uninstall Remove the installed node and npm
Options:
-V, --version Output version of n
-h, --help Display help information
-q, --quiet Disable curl output (if available)
-d, --download Download only
-a, --arch Override system architecture
--all ls-remote displays all matches instead of last 20
--insecure Turn off certificate checking for https requests (may be needed from behind a proxy server)
Aliases:
which: bin
run: use, as
ls: list
lsr: ls-remote
rm: -
lts: stable
latest: current
Versions:
Numeric version numbers can be complete or incomplete, with an optional leading 'v'.
Versions can also be specified by label, or codename,
and other downloadable releases by <remote-folder>/<version>
4.9.1, 8, v6.1 Numeric versions
lts Newest Long Term Support official release
latest, current Newest official release
boron, carbon Codenames for release streams
and nightly, chakracore-release/latest, rc/10 et alLTS版Node.js1
[root@VM-202 ~]#n lts
- 升级NPM
1
2
3
4
5[root@VM-202 ~]# npm -g install npm
/usr/local/bin/npm -> /usr/local/lib/node_modules/npm/bin/npm-cli.js
/usr/local/bin/npx -> /usr/local/lib/node_modules/npm/bin/npx-cli.js
+ npm@6.13.0
added 2 packages from 2 contributors, removed 2 packages and updated 15 packages in 7.73s - 注释
/etc/profile中老版本的配置1
export PATH=/usr/local/lib/node-v12.13.0-linux-x64/bin:$PATH
windows的童鞋可参考菜鸟教程
Git
Linux系统下安装Git非常简单, 用包管理命令:
1 | sudo apt-get install git |
windows下就直接到Git官网 下载安装即可
安装完成后执行 git --version 验证是否成功
1 | [root@VM-202 ~]# git --version |
Hexo
安装Hexo只需一条命令, 详细移步至官档, 重点说常用命令和配置
1 | npm install -g hexo-cli |
常用命令
1 | hexo init <folder> # 初始化一个网站. 如果没有设置 folder , Hexo 默认在目前的文件夹建立网站 |
配置文件
注意
_config.yml的区分:hexo init生成的目录下的_config.yml为Hexo配置文件,themes目录下主题文件夹里的_config.yml为主题配置文件, 如themes\next\_config.yml。
我的Hexo配置文件_config.yml
1 | title: Hoke's blog |
我的Hexo应用程序信息package.json
1 | { |
NexT
使用 Hexo 也是因为喜欢 NexT 模板, 简单漂亮。本章节主要介绍安装、配置、自定义页面模板
安装
最简单的安装方式是直接克隆整个仓库:
1 | $ cd <hexo-init-folder> |
此外, 如果你想要使用其他方式, 你也可以参见详细安装步骤。
配置
在开始之前需要先将 Hexo 默认的主题配置改为 NexT
打开 Hexo 配置文件, 找到 theme 字段, 并将其值更改为 next
1 | theme: next |
然后 hexo clean && hexo g -d && hexo s 即可预览 NexT 默认的主题效果
数据文件
当使用 git pull 更新 NexT 主题时经常需要解决冲突问题, 而在手动下载 release 版本时也经常需要手动合并配置, 所以为了解决版本冲突的问题我们使用 NexT 的数据文件
如果在新的 release 中出现了任何新的选项, 那么你只需要从 /themes/next/_config.yml 中将他们复制到 /source/_data/next.yml 中并设置它们的值为你想要的选项。
用法
- 请确认你的 Hexo 版本为 3.0 或更高。
- 在你站点的
/source/_data目录创建一个next.yml文件(如果_data目录不存在, 请创建之)。
以上步骤之后有 两种选择, 请任选其一然后继续后面的步骤。
选择 1:
override: false(默认):- 检查默认 NexT 配置中的
override选项, 必须设置为false。
在next.yml文件中, 也要设置为false, 或者不定义此选项。 - 从站点配置文件(
/_config.yml)与主题配置文件(/themes/next/_config.yml)中复制你需要的选项到/source/_data/next.yml中。
- 检查默认 NexT 配置中的
选择 2:
override: true:- 在
next.yml中设置override选项为true。 - 从
/themes/next/_config.yml配置文件中复制所有的 NexT 主题选项到/source/_data/next.yml中。
- 在
- 然后, 在站点的
/_config.yml中需要定义theme: next选项(如果需要的话,source_dir: source)。 - 使用标准参数来启动服务器, 生成或部署(
hexo clean && hexo g -d && hexo s)。
最佳实践为选择 1 , copy 需要修改的选项至 next.yml , 配置文件中的注释说明基本够用, 不清楚地参考NexT官方文档和NexT github, NexT github托管项目 docs 目录下有markdown文档, 有中文版的哦。
自定义 scheme
不建议自定义,如果官方对 scheme 有更新,需要人工检查原 scheme 的修改内容,再更新至新增的自定义 scheme,费事儿
由于我对 scheme 修改较多, 怕 git pull 更新时报冲突, 干脆直接新增专用 scheme , 以下是基本思路:
- 选择中意的 schemes 我是基于 Mist 基础上修改的, 在
/themes/next/source/css/_schemes下复制Mist为Hoke(自定义) /themes/next/source/css/_variables下 复制Mist.styl为Hoke.styl- 全局搜索
Mist在匹配到的文件中按照Mist新增Hoke部分1
2
3
4
5
6
7
8
9
10
11
12
13
14
15
16
17
18
19
20
21
22
23
24
25
26
27
28
29
30
31
32
33
34
35
36
37
38
39
40
41
42
43
44
45
46[root@VM-202 /home/hoke/Documents/blog/themes/next]# git diff scripts/filters/minify.js
diff --git a/scripts/filters/minify.js b/scripts/filters/minify.js
index 6640242..6238bbc 100644
--- a/scripts/filters/minify.js
+++ b/scripts/filters/minify.js
@@ -50,4 +50,7 @@ hexo.extend.filter.register('after_generate', () => {
} else if (theme.scheme === 'Pisces' || theme.scheme === 'Gemini') {
hexo.route.remove('js/schemes/muse.js');
}
+ if (theme.scheme === 'Hoke') {
+ hexo.route.remove('js/local-search.js');
+ }
});
[root@VM-202 /home/hoke/Documents/blog/themes/next]# git diff source/css/_common/outline/header/github-banner.styl
diff --git a/source/css/_common/outline/header/github-banner.styl b/source/css/_common/outline/header/github-banner.styl
index 42a433a..434c08d 100644
--- a/source/css/_common/outline/header/github-banner.styl
+++ b/source/css/_common/outline/header/github-banner.styl
}
}
- if ($scheme == 'Mist') {
+ if ($scheme == 'Mist') || ($scheme.scheme === 'Hoke') {
+mobile() {
svg {
top: inherit;
[root@VM-202 /home/hoke/Documents/blog/themes/next]# git diff source/js/utils.js
diff --git a/source/js/utils.js b/source/js/utils.js
index a249585..754423f 100644
--- a/source/js/utils.js
+++ b/source/js/utils.js
@@ -335,6 +335,10 @@ NexT.utils = {
return CONFIG.scheme === 'Mist';
},
+ isHoke: function() {
+ return CONFIG.scheme === 'Hoke';
+ },
+
isPisces: function() {
return CONFIG.scheme === 'Pisces';
}, /source/_data/next.yml新增 scheme1
2
3
4
5#scheme: Muse
#scheme: Mist
#scheme: Pisces
#scheme: Gemini
scheme: Hoke- 执行
hexo clean && hexo g && hexo s可预览效果, 如果遇报错别慌, 看一下报错的文件是不是哪个地方还漏改啦
成功之后就可以在自定义的 scheme 上折腾啦!
Git 及源码管理
安装 hexo-deployer-git
1 | $ npm install hexo-deployer-git --save |
GitHub
Github 需要开通 Github Page , 网上一搜一大把, 不啰嗦啦
打 Hexo 配置文件 _config.yml , 拉到底部, 修改部署配置:
1 | deploy: |
执行 hexo clean && hexo g -d , 输入 Git 的账号和密码,完成后在浏览器输入 yourName.github.io, Enjoy it!
Coding or Gitee
Gitee Pages 免费版不支持自定义域名,放弃转 coding
登录 Coding 创建一个同名账号的 repository ,在项目仓库内一键开通 Pages 服务
打 Hexo 配置文件 _config.yml , 拉到底部, 修改部署配置:
1 | deploy: |
执行 hexo clean && hexo g -d , 输入 Git 的账号和密码, 完成后在浏览器输入 yourName.coding.me 测试
网站源码管理最佳实践
本节主要介绍如何管理网站源码
NexT 源码
大家总会对 NexT 自定义修改,目标是管理自定义修改源码兼顾 hexo-theme-next 官方更新,涉及 Git 基础知识。
cd themes/next进入 NexT 主题目录,本地仓库创建自己源码分支git checkout -b <branch>, 并在该分支上修改自己的配置,源码修改后的内容提交本地仓库
1
2git add .
git commit -m '注释'Fork hexo-theme-next 至自己的 Github 仓库
执行以下命令添加自己的 Fork 的仓库
1
2git remote add github git@github.com:theme-next/hexo-theme-next.git # 记得替换成自己的仓库
git remote -v # 添加成功后检查把当前分支推送自己 Github 远程库
1
2
3
4
5
6
7
8
9
10
11
12
13
14$ git push -u github hoke
Counting objects: 46, done.
Delta compression using up to 4 threads.
Compressing objects: 100% (46/46), done.
Writing objects: 100% (46/46), 287.64 KiB | 932.00 KiB/s, done.
Total 46 (delta 18), reused 0 (delta 0)
remote: Resolving deltas: 100% (18/18), completed with 12 local objects.
remote:
remote: Create a pull request for 'hoke' on GitHub by visiting:
remote: https://github.com/hoke58/hexo-theme-next/pull/new/hoke
remote:
To github.com:hoke58/hexo-theme-next.git
* [new branch] hoke -> hoke
Branch 'hoke' set up to track remote branch 'hoke' from 'origin'.Hexo 站点源码管理
目标: 站点源码和托管在 Github 上的的静态资源同一个仓库,不同分支;站点源码库引用 NexT 源码仓库为子模块
进入站点根目录初始化 Git 仓库
git init创建并切换分支
git checkout -b source删除或移走 NexT 主题
mv themes/next /tmp(可选)如果之前已生成 Git 仓库,先删除仓库中的 NexT
git -rm themes/next添加子模块,成功后会生成
.gitmodules1
git submodule add -b hoke git@github.com:hoke58/hexo-theme-next.git themes/hexo-theme-next/
提交本地仓库
1
2git add .
git commit -m '新增子模块'本地 source 分支推送自己远程库 source 分支
1
$ git push -u origin source
Github 网页上查看是否成功
git submodule 更多说明移步 Git 工具 - 子模块
图床
选型之前先做了一波调研,主要就七牛和又拍云, 因为需要使用 CDN , 简单说明:
- 又拍云:10G 免费空间, 15G 流量, 支持 https, 需ICP备案
- 七牛云:10G 免费空间, 10G 流量, 免费版不支持 https, 需ICP、公安备案
https 已是趋势,又拍云亦是老牌的 CDN
又拍云
- 注册又拍云,个人站点申请个人账号即可
- 注册成功后进入控台,点击「云存储」- 「立即使用」

- 点击传送门开始使用又拍云存储,在「云存储」页面点击创建服务。
- 服务创建后,点击「配置」,根据自己的需求配置,晒一下我修改的部分


- 使用 FTP 工具上传图片,传送门 FTP/FTPS, 文件上传后可以网页上查看

- 至此,又拍云图床服务就 OK 啦!最后也是最重要的加入又拍云联盟。下载logo,选个适合自己风格的logo把链接和logo加入网站页脚,申请后五个工作日内会有结果。
NexT 页脚悬挂又拍云联盟 Logo
先上一下效果图
NexT 主题仓库修改:
1 | diff --git a/languages/en.yml b/languages/en.yml |
/source/_data/next.yml 自定义数据文件增加:
1 | footer: |
图床工具
PicGo支持微博图床,七牛云,腾讯云 COS,又拍云,GitHub,SM.MS 图床,阿里云 OSS,Ingur。支持 macOS、windows 64 位系统,完全免费。
我是用VScode作为 markdown 编辑,主要介绍 VScode 插件 vs-picgo,在 VSCode 里使用 picgo,实现快速上传图片到远端图床并直接将 URL 写进 Markdown 文件里,极大提升 Markdown 贴图效率与体验。支持 PicGo 原生自带的 8 种图床。
截图上传

文件管理器选择上传

输入文件路径上传

安装
在插件商店中查找PicGo,并安装
配置
2.0.0开始, VSCode 设置中可以自定义配置 Picgo
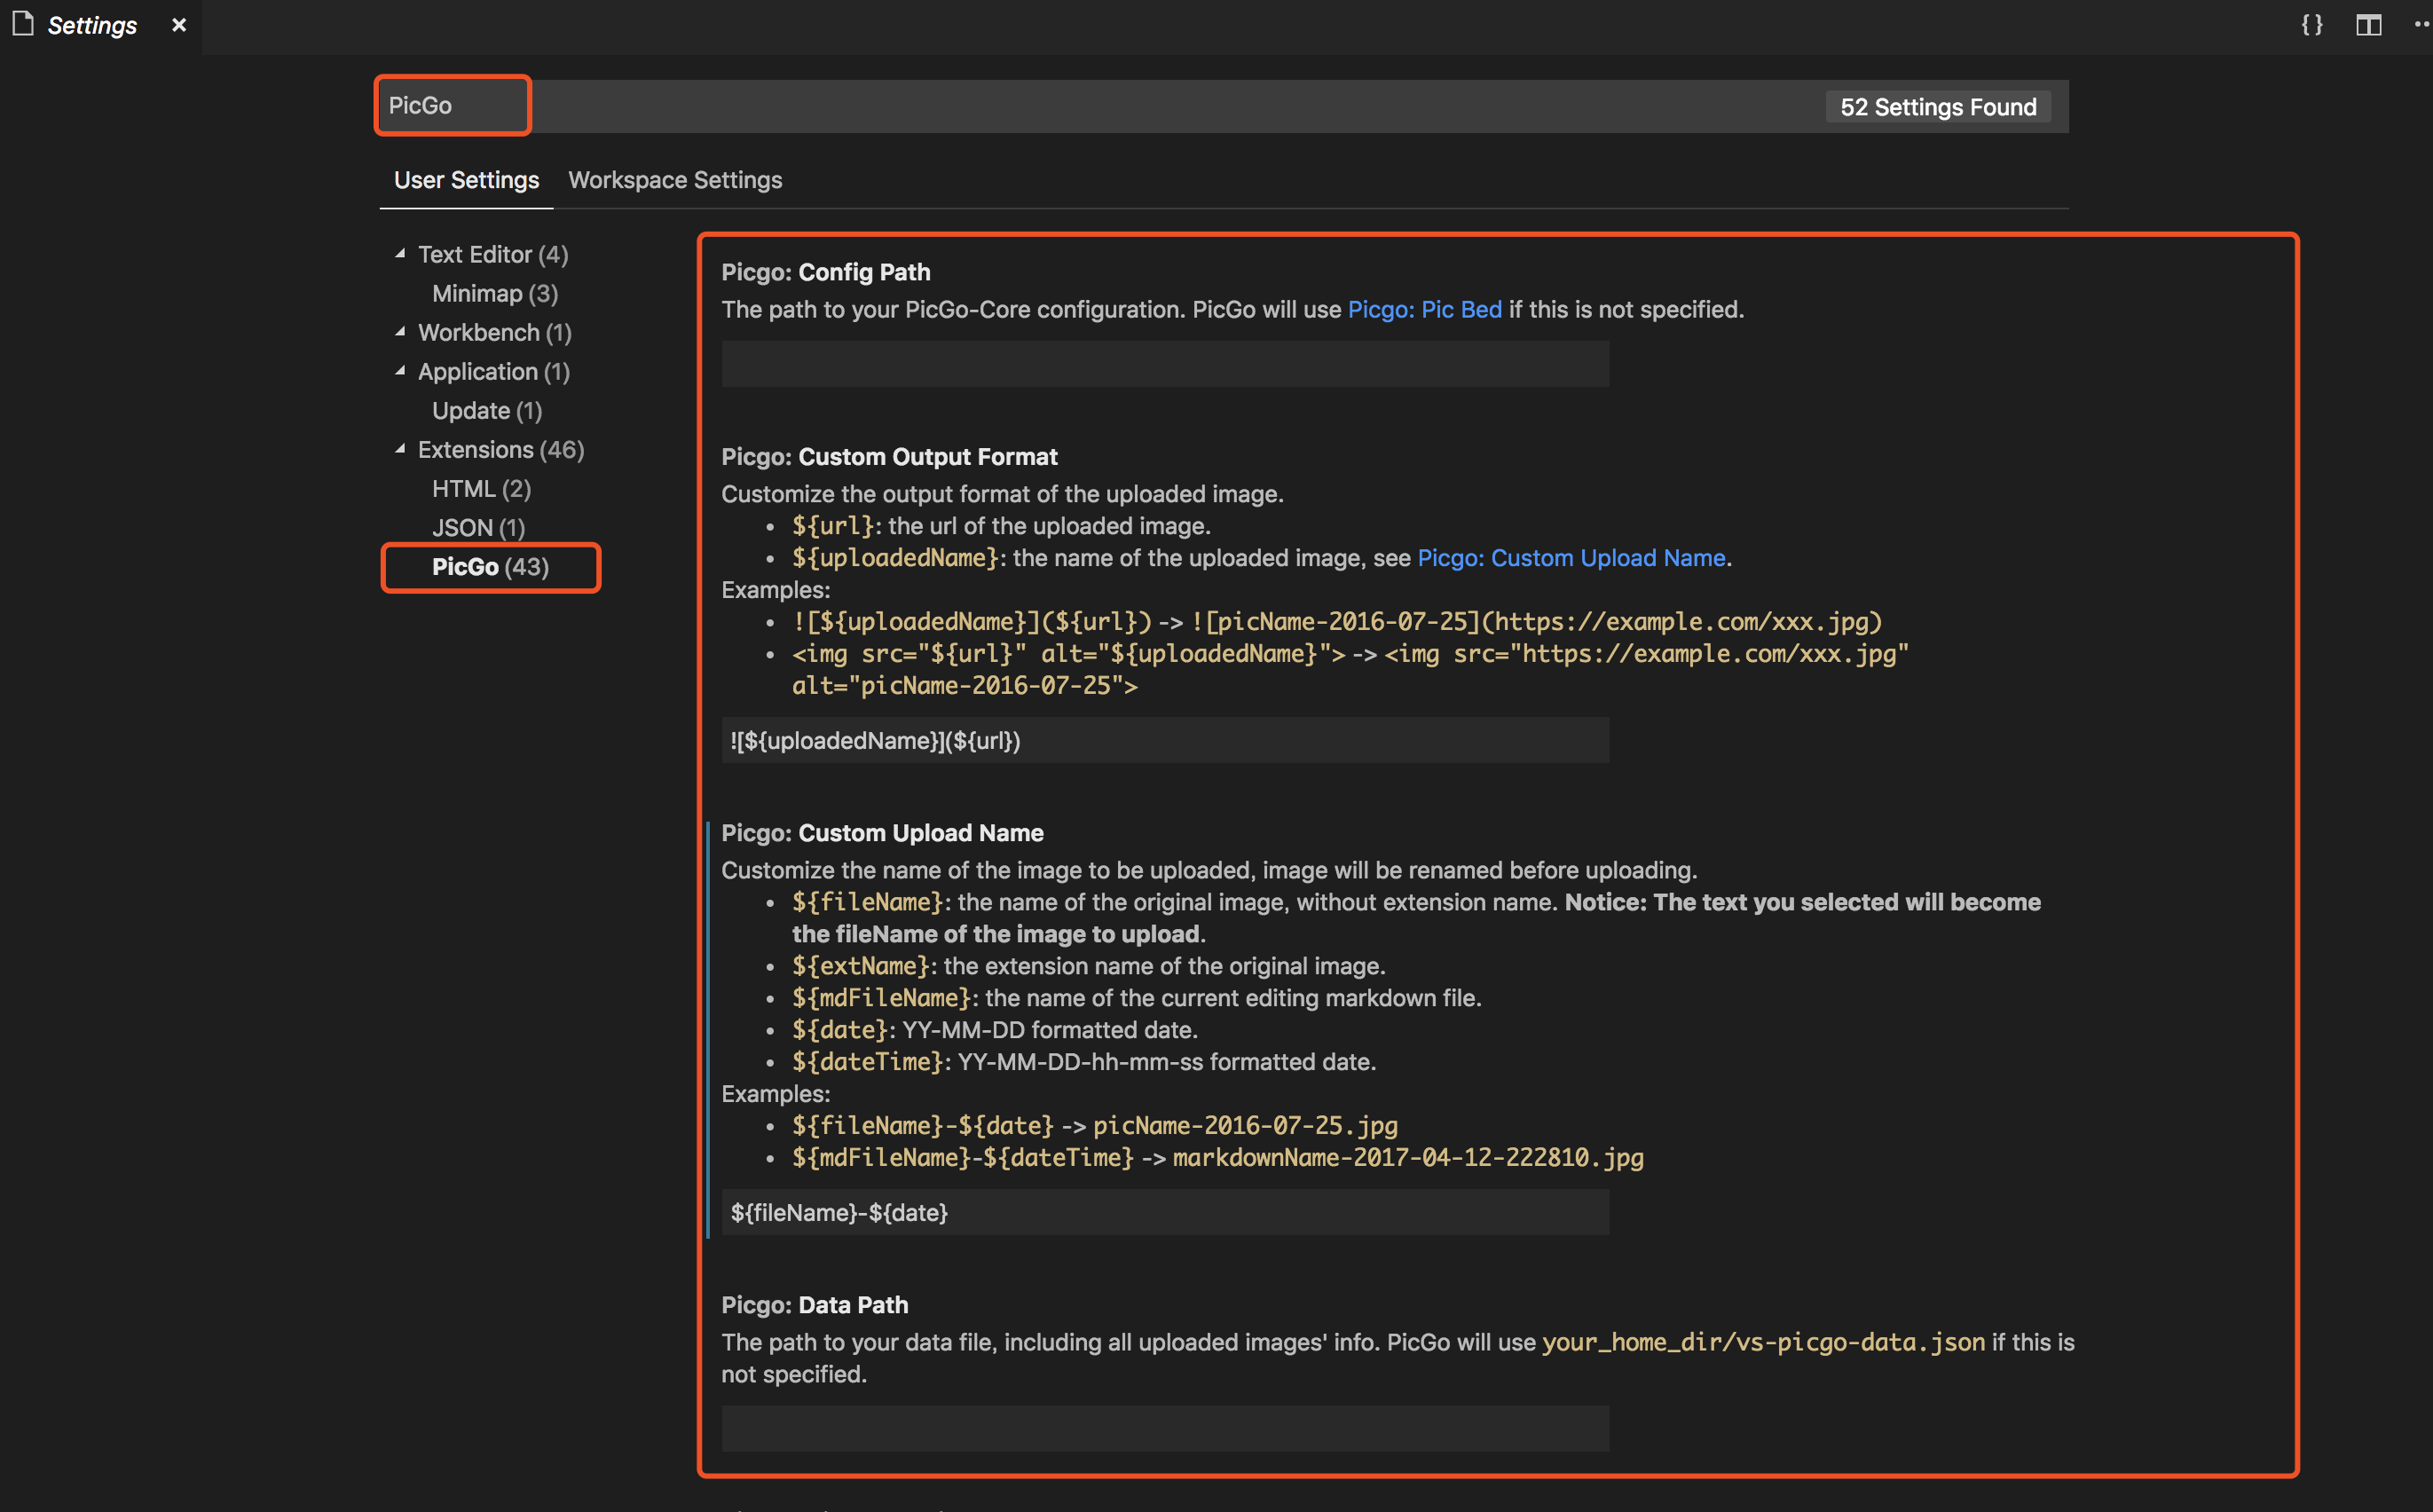
首先选择当前图床,我们选择 upyun
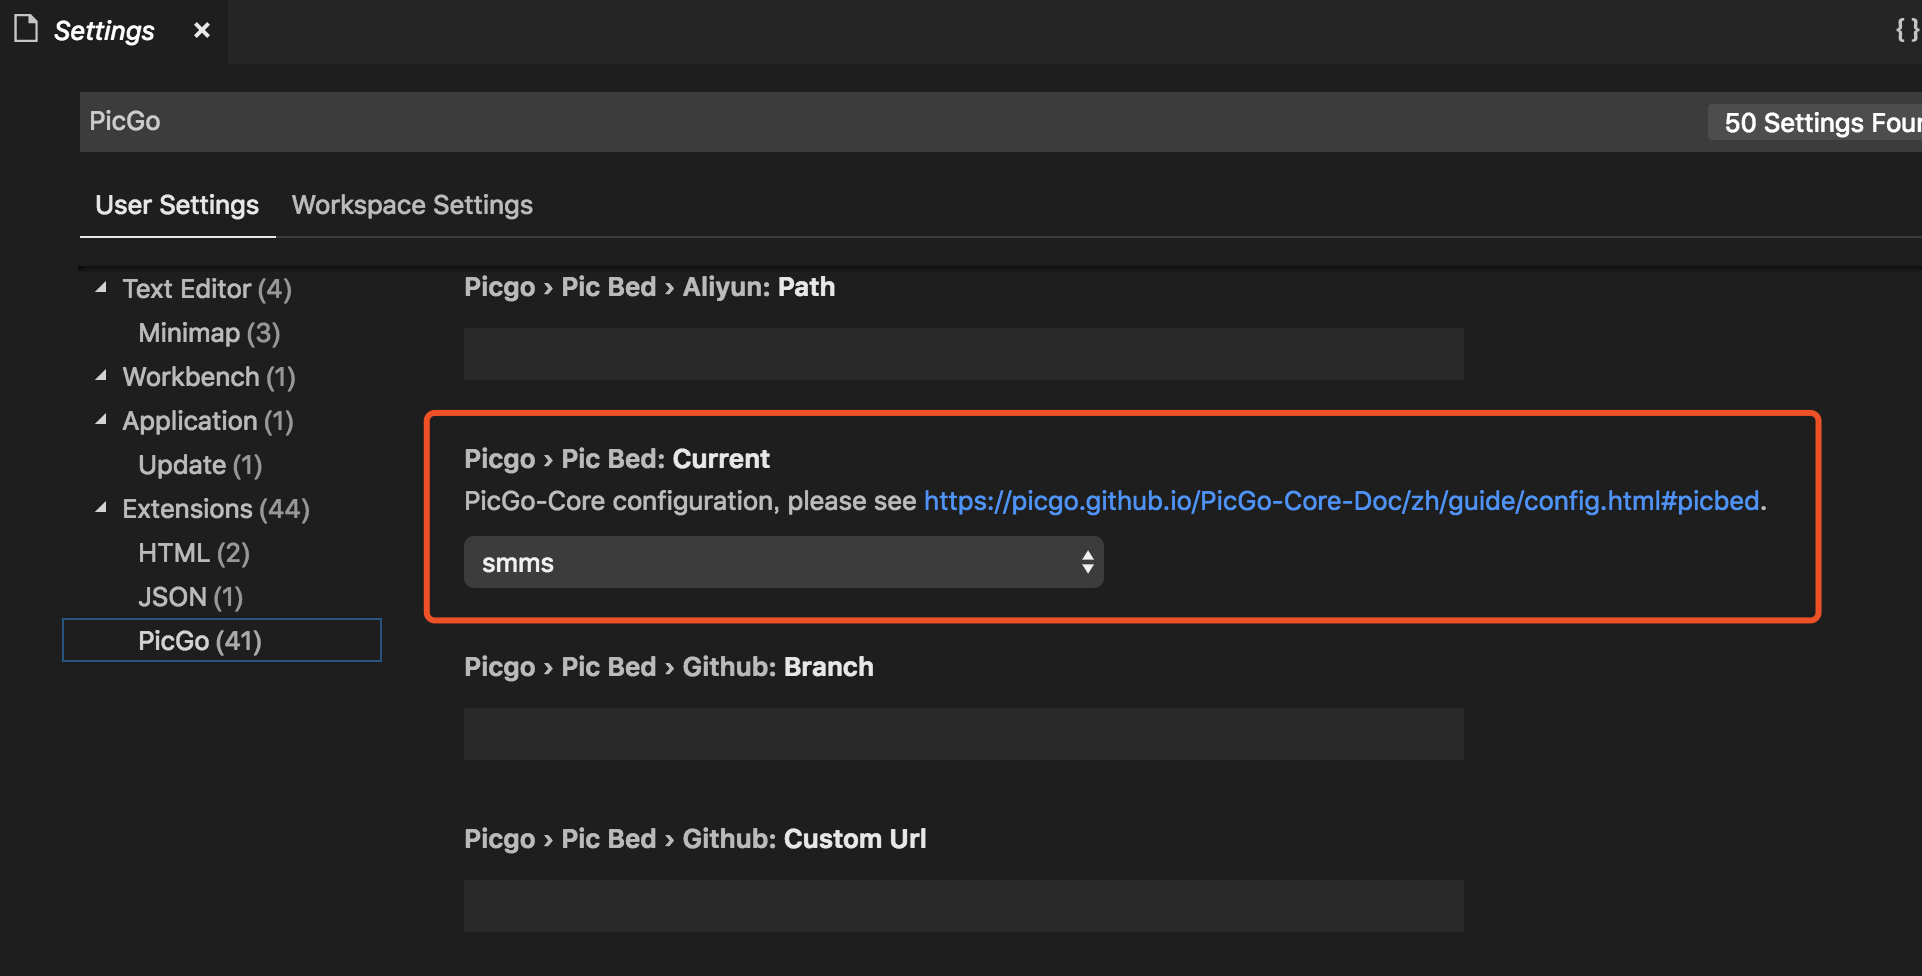
然后输入 upyun 的参数

自定义上传图片的名字
Notice: 如果选中文本上传,选中的部分即为上传图片的文件名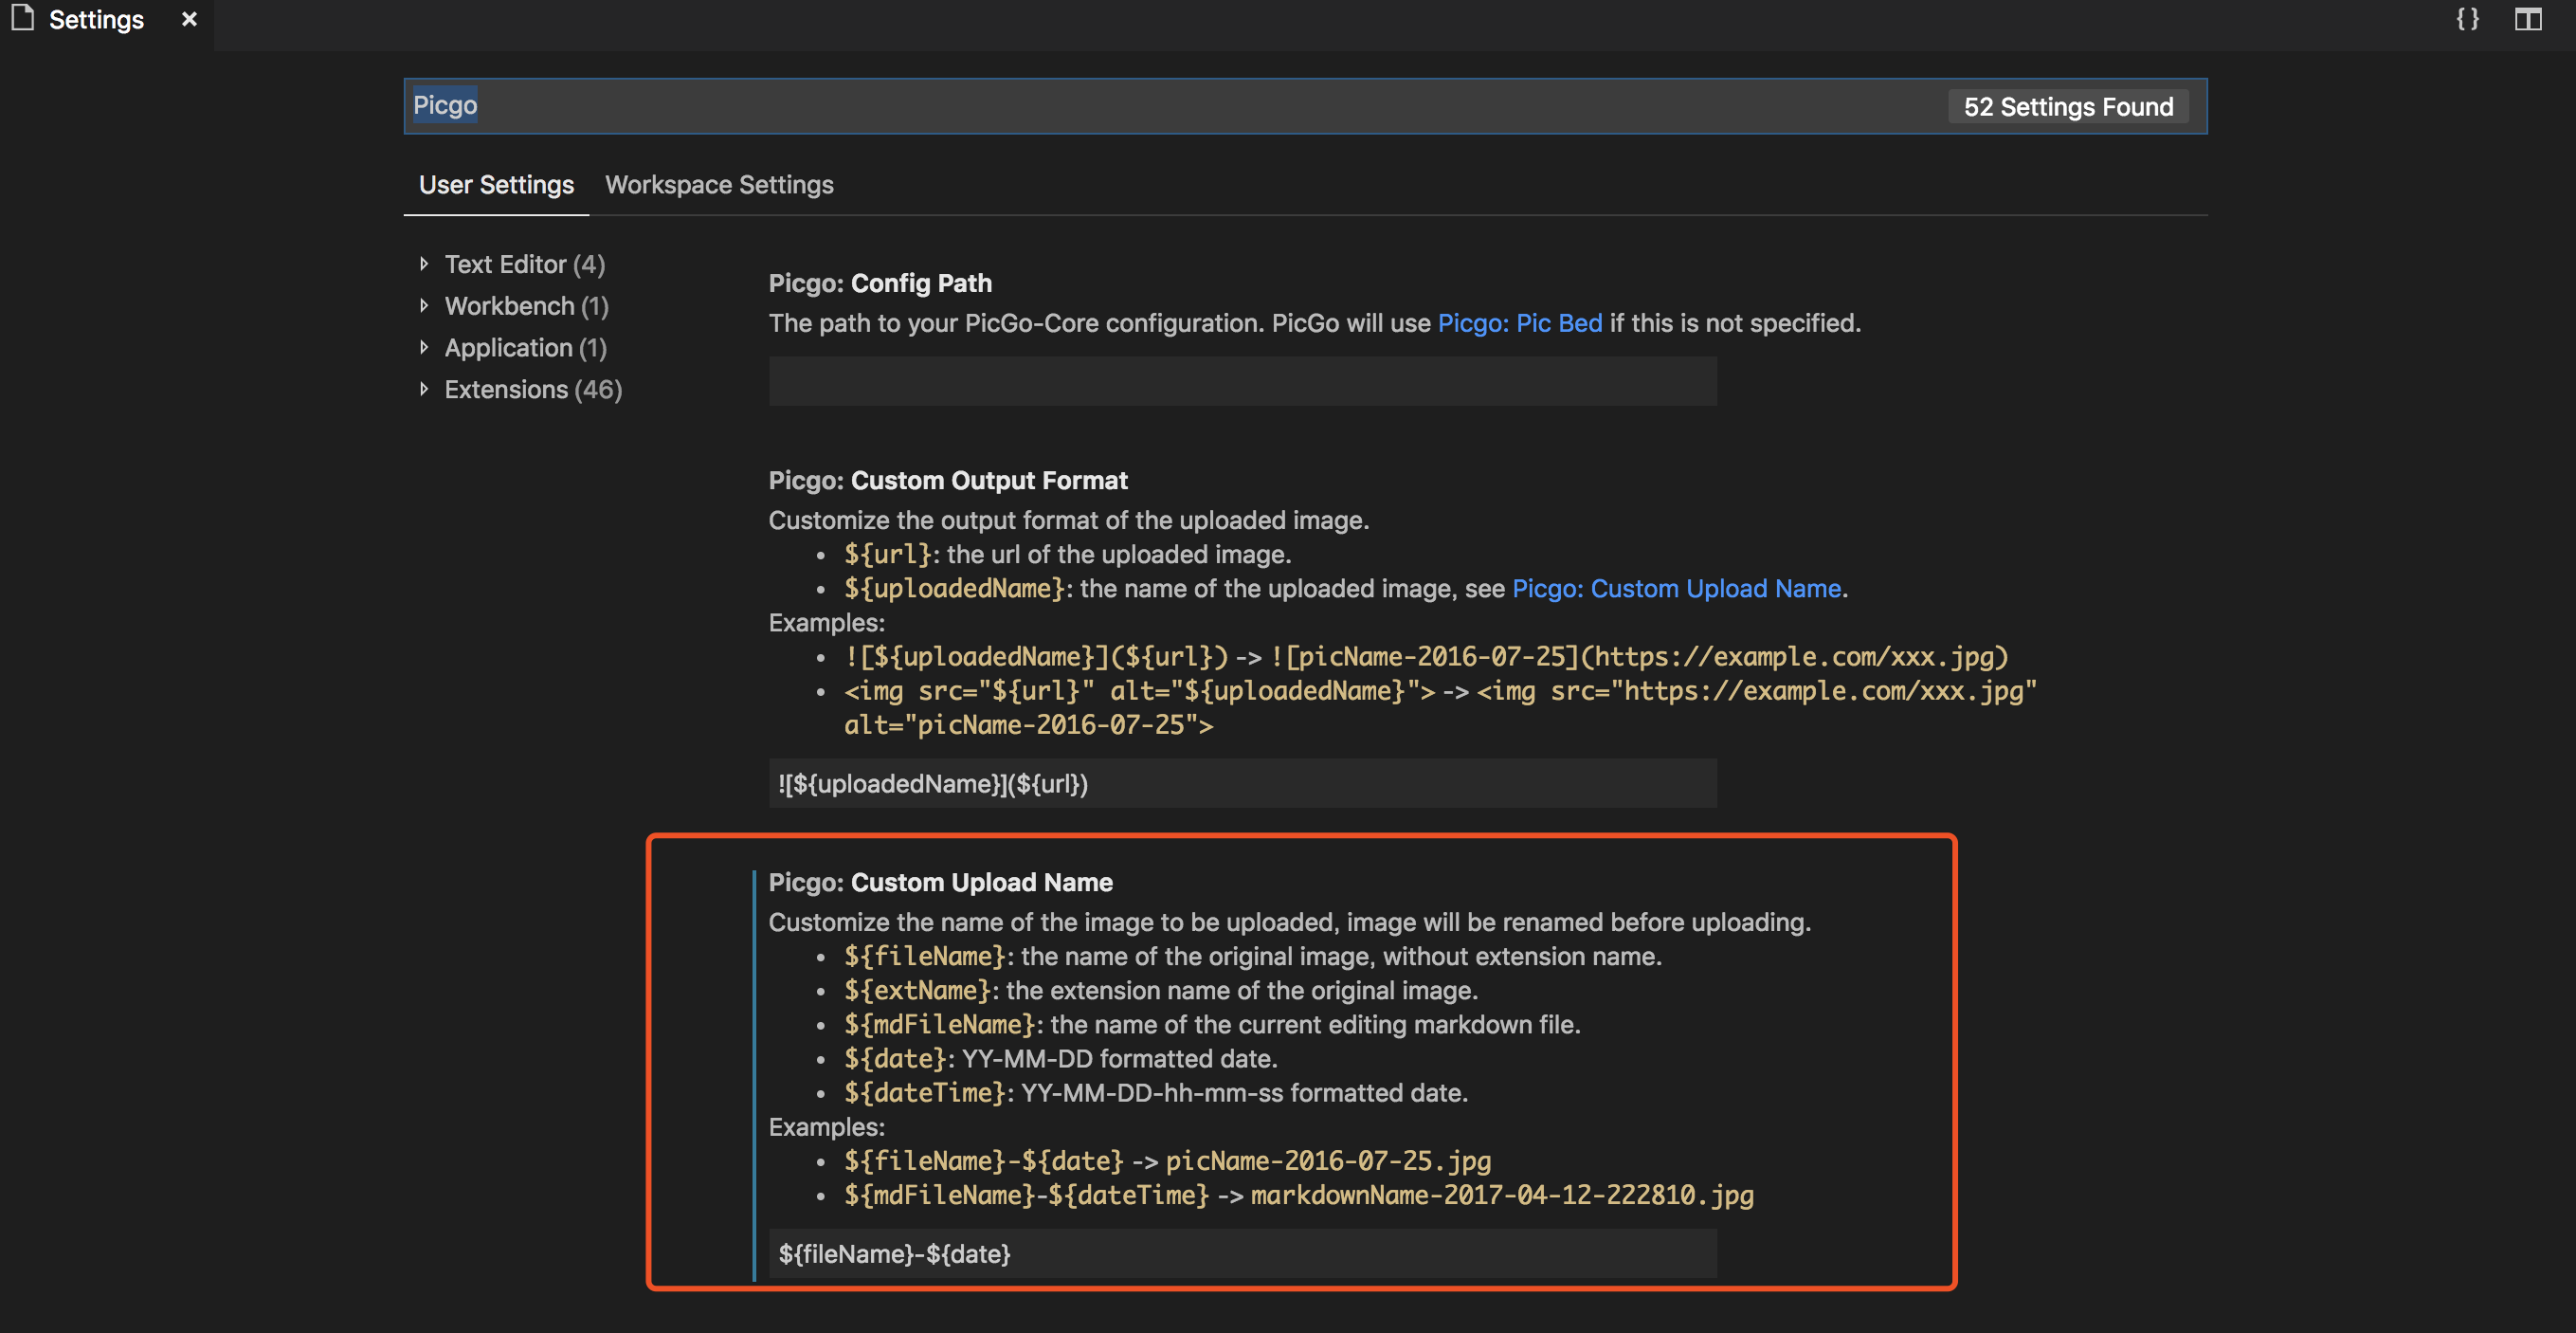
上传图片后md输出格式

如果你指定的picgo的path为空,那么将使用 VSCode 默认的setting.json作为配置文件。
配置文件内容(usersetting.json 文件中 picgo.path 路径指定的文件)里需要配置的项主要是picBed:
详细信息可参看 PicGo-配置
1 | { |
键盘快捷键
| OS | 剪贴板图片上传 | 打开文件管理器上传 | 打开输入框输入路径上传 |
|---|---|---|---|
| Windows/Unix | Ctrl + Alt + U | Ctrl + Alt + E | Ctrl + Alt + O |
| OsX | Cmd + Opt + U | Cmd + Opt + E | Cmd + Opt + O |
以上快捷键均可重新自定义。
使用其它编辑器的同学, 可以下载PicGo,配合使用,开始优雅地书写 Markdown 吧
CDN 加速
远在海外的 Github,国内访问经常抽风,开始为博客加速吧
有了图床使用的经验,使用 CDN 相对容易上手,先上官档 针对自主源,如何创建 CDN 服务?了解一下大概。
都是页面操作直接上图吧


最后把 HTTPS 开启即可,上一张网站测速看一下效果吧
启用评论系统
NexT 内置了多款评论系统,博主安装了 Valine 和畅言两款评论系统进行比较供大家参考
valine
Valine 诞生于2017年8月7日,是一款基于 LeanCloud 的快速、简洁且高效的无后端评论系统。
理论上支持但不限于静态博客,目前已有Hexo、Jekyll、Typecho、Hugo、Ghost 等博客程序在使用 Valine。
先看一下效果图

启用 Valine 只需要三步
- 注册 LeanCloud 账号, 然后再控制台左下角点击
创建应用(应用名随意) - 选择刚刚创建的
应用>设置>选择应用 Key,然后你就能看到你的APP ID和APP KEY了 - 拿到
APP ID和APP KEY之后,设置Hexo配置文件_config.yml1
2
3
4
5
6
7
8
9
10
11
12
13
14
15
16valine:
enable: true # When enable is set to be true, leancloud_visitors is recommended to be closed for the re-initialization problem within different leancloud adk version
appid: # Your leancloud application appid
appkey: # Your leancloud application appkey
notify: true # Mail notifier. See: https://github.com/xCss/Valine/wiki
verify: false # Verification code
placeholder: 亲,欢迎评论 # Comment box placeholder
avatar: mm # Gravatar style
guest_info: nick,mail # Custom comment header
pageSize: 10 # Pagination size
language: zh-cn # Language, available values: en, zh-cn
visitor: false # leancloud-counter-security is not supported for now. When visitor is set to be true, appid and appkey are recommended to be the same as leancloud_visitors' for counter compatibility. Article reading statistic https://valine.js.org/visitor.html
comment_count: true # If false, comment count will only be displayed in post page, not in home page
recordIP: true # Whether to record the commenter IP
serverURLs: https://leancloud.hoke58.cn # When the custom domain name is enabled, fill it in here (it will be detected automatically by default, no need to fill in)
#post_meta_order: 0

最后!记得在Leancloud -> 设置 -> 安全中心 -> Web 安全域名 把你的域名加进去
hexo clean && hexo g -d && hexo s 是不是就能看到评论框了
畅言
搜狐加持,样式美观大方,自带第三方登录系统,后台功能强大,但是需要域名备案,先上张效果图

很遗憾的是在 Thu Dec 12 16:23:50 CST 2019 调试的时候无法登录,试了下官方也无法登录评论,已反馈至官方
以下是启用畅言的步骤
- 进入 畅言 官网,注册账号
- 登录后添加站点信息,等待审核
- 点击
后台总览获取APP ID、APP KEY, 设置 Hexo 配置文件最后执行1
2
3
4
5changyan:
enable: false
appid: cyuzQEhXS
appkey:
#post_meta_order: 0hexo clean && hexo g -d && hexo s查看效果
站内搜索
NexT 主题集成三种站内搜索: Algolia Search, Swiftype Search, Local Search。前两者都需要注册第三方服务,后者是本地搜索。简单易用原则本站采用本地搜索,也是官方推荐的方案
安装步骤
在 hexo 站点根目录安装
hexo-generator-searchdb1
npm install hexo-generator-searchdb --save
编辑 hexo 配置文件增加以下内容
1
2
3
4
5search:
path: search.xml
field: post
format: html
limit: 10000编辑 NexT 配置文件启用 Local Search
1
2
3
4
5
6
7
8
9
10
11
12# Dependencies: https://github.com/theme-next/hexo-generator-searchdb
local_search:
enable: true
# If auto, trigger search by changing input.
# If manual, trigger search by pressing enter key or search button.
trigger: auto
# Show top n results per article, show all results by setting to -1
top_n_per_article: -1
# Unescape html strings to the readable one.
unescape: false
# Preload the search data when the page loads.
preload: false站点地图 sitemap.xml
生成站点地图可以提交至搜索引擎收录
在 hexo 根目录安装以下两个插件
1
2npm install hexo-generator-sitemap --save
npm install hexo-generator-baidu-sitemap --save重新构建网站查看效果
1
hexo clean && hexo g && hexo s
public 目录下自动生成 sitemap.xml 和 baidusitemap.xml
持续集成交付 CI/CD
达成效果
原先发布博客流程:
- 搭建hexo环境(一系列软件安装,配置)
- hexo new “文章名称”
- 编写md文档
- hexo clean
- hexo generate
- hexo deploy
使用 Travis CI 后简化成: - hexo new “文章名称”
- 编写md文档
- git push
也就是说以后发布博客只要更新源码库即可, Travis CI 会自动生成静态文件推送至 pages 仓库里
配置操作
- 将 Travis CI 添加到你的 GitHub 账户中。
- 前往 GitHub 的 Applications settings,配置 Travis CI 权限,使其能够访问你的源码 repository。

- 你应该会被重定向到 Travis CI 的页面。如果没有,请 手动前往。
- 在浏览器新建一个标签页,前往 GitHub 新建 Personal Access Token,只勾选 repo 的权限并生成一个新的 Token。Token 生成后请复制并保存好。

- 回到 Travis CI,前往你的 repository 的设置页面,在 Environment Variables 下新建一个环境变量,Name 为
GH_TOKEN,Value 为刚才你在 GitHub 生成的 Token。确保 DISPLAY VALUE IN BUILD LOG 保持 不被勾选 避免你的 Token 泄漏。点击 Add 保存。
- 前往 Github 源码库 repository 中添加 Deploy keys

- Travis CI Settings 中添加** SSH Key**,使其能有权限读取仓库

- 在你的 Hexo 站点文件夹中新建一个 .travis.yml 文件:
1
2
3
4
5
6
7
8
9
10
11
12
13
14
15
16
17
18
19
20
21
22
23
24
25
26
27
28
29
30
31
32
33
34
35
36
37
38
39
40
41
42
43
44
45
46# 指定构建环境是Node.js,当前版本是稳定版
language: node_js
node_js: stable
# 设置钩子只检测blog-source分支的push变动
branches:
only:
- source
# 设置缓存文件
cache:
directories:
- node_modules
#在构建之前安装hexo环境
before_install:
- npm install -g hexo-cli
#安装git插件和搜索功能插件
install:
- npm install
# 设置git提交名,邮箱;替换真实token到_config.yml文件
before_script:
- git config user.name ${UserName}
- git config user.email ${UserEmail}
# 替换同目录下的_config.yml文件中github_token字符串为travis后台刚才配置的变量,注>意此处sed命令用了双引号。单引号无效!
- sed -i "s/github_token/${GH_TOKEN}/g" _config.yml || exit 1
- sed -i "s/coding_token/${CODING_TOKEN}/g" _config.yml || exit 1
# 执行清缓存,生成网页操作
script:
- git submodule init # 用于更新主题
- git submodule update
- hexo clean
- hexo generate
- hexo deploy
# configure notifications (email, IRC, campfire etc)
# please update this section to your needs!
# https://docs.travis-ci.com/user/notifications/
notifications:
email:
- ${UserEmail}
on_success: change
on_failure: always - 修改下 hexo 站点根目录下
_config.yml文件的 deploy 节点1
2
3
4
5
6
7
8
9
10
11
12
13
14
15
16[hoke@VM-202 ~/Documents/blog]$ git diff 58c6ba815d9893b6c760a6866d09079631ee27b5 d4184026a7ded278509a8b6b88cb5b98fa68c53c _config.yml
diff --git a/_config.yml b/_config.yml
index 6283ffb..8815cce 100644
--- a/_config.yml
+++ b/_config.yml
@@ -108,8 +108,8 @@ symbols_count_time:
deploy:
type: git
repo:
- github: https://github.com/hoke58/hoke58.github.io
- coding: https://git.coding.net/hoke58/hoke58.git
+ github: https://github_token@github.com/hoke58/hoke58.github.io
+ coding: https://hoke58:coding_token@git.coding.net/hoke58/hoke58.git
branch: master
search: git push后查看 Travis CI 效果
Travis 的 构建流程
before_installinstallbefore_scriptscriptafter_successorafter_failurebefore_deploy,可选deploy,可选after_deploy,可选after_script

